Neon now has beta support for Postgres Logical Replication. This enables teams to use Change Data Capture (CDC) to observe database changes – such as INSERT and UPDATE operations – and stream these changes to downstream systems.
We previously wrote about the benefits of CDC and how it enables Event-Driven Architecture (EDA). An EDA facilitates the implementation of messaging patterns, such as fan-out, with your Neon Postgres database at the heart of the system.
Implementing a fan-out pattern enables you to create applications composed of loosely coupled components. Downstream consumers can work individually or as groups to asynchronously process database events to update other parts of your system in real-time.
For example, a user sending a message in your application might necessitate sending a push notification to other users. If the message is written to the database and, in turn, a message broker, the broker can facilitate fan-out in a one-to-many fashion to downstream consumers, one of which is repsonsible for delivery to mobile devices. But how exactly do you stream changes from Postgres to a message broker, and why can’t the application layer simply handle this task? Keep reading to find out.

This guide will show you how to use Debezium Server with Neon’s serverless Postgres, and Redis streams provided by Upstash, to enable message fan-out with at-least-once delivery semantics. A repository with a sample Node.js consumer for the data produced by Debezium to Redis streams is available on GitHub at evanshortiss/neon-debezium-redis-cdc.
The Dual Write Problem
Before we dive into the solution, let’s understand why it’s recommended to use a CDC platform like Debezium to stream changes from Postgres to a message broker.
Imagine a scenario where you must insert or update a record in Postgres and notify downstream systems of the write operation in real-time. The delivery requirements for such a system are typically at-least-once, i.e., you need guaranteed delivery to the event consumers. A naive approach to this problem involves dual writes.
A dual write occurs when you alter data in two systems without ensuring consistency. The following pseudocode provides a simple illustration of the dual-write problem:
async function insertAndPublishMessage (data) {
  await postgres.query(
    SQL`
      INSERT INTO messages (from, to, content)
      VALUES (${data.from},${data.to},${data.content})
    `
  )

  await broker.publish('message.insert', data)
}
In a perfect world, this code persists data in Postgres, and once successful, it publishes an event to a message broker such as Redis streams, Apache Kafka, or Amazon Kinesis. This broker facilitates a fan-out pattern, as shown in the following architecture diagram.
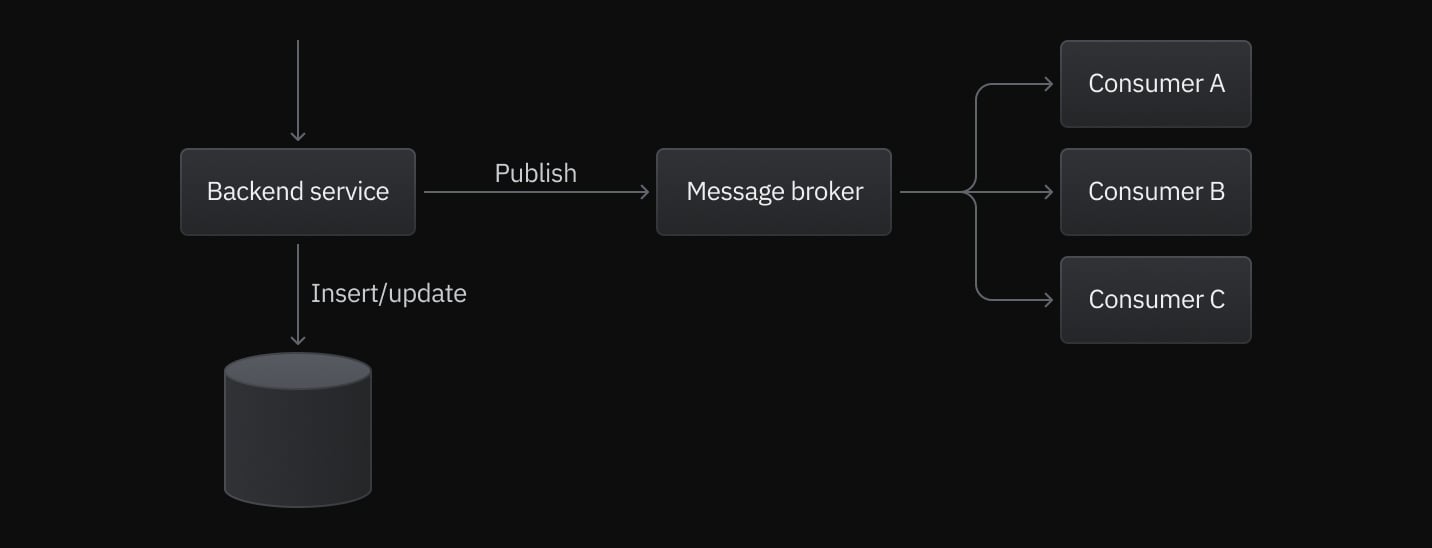
If the database transaction fails, the prior code will throw an error and not publish a message to the message broker. However, if the database transaction succeeds but the message broker is down, you could end up with an inconsistent state because the downstream consumers are unaware of the database change(s). Changing the order of operations doesn’t help since you might inform downstream consumers of a change that fails to be committed to the database.
Maybe you’re thinking that Postgres’ nifty LISTEN and NOTIFY capabilities offer a solution to this problem; however, those provide an at-most-once delivery mechanism, meaning sent events will be lost if downstream listeners are briefly disconnected from Postgres.
Using Debezium to Avoid Dual Writes
Debezium consumes changes from Postgres’ write-ahead log (WAL) via a logical replication slot and streams these changes to messaging infrastructure in real-time. By consuming the WAL, only committed changes to the database are processed by Debezium and reliably forwarded to downstream message brokers, thus avoiding the dual write problem. This is illustrated in the following architectural diagram:
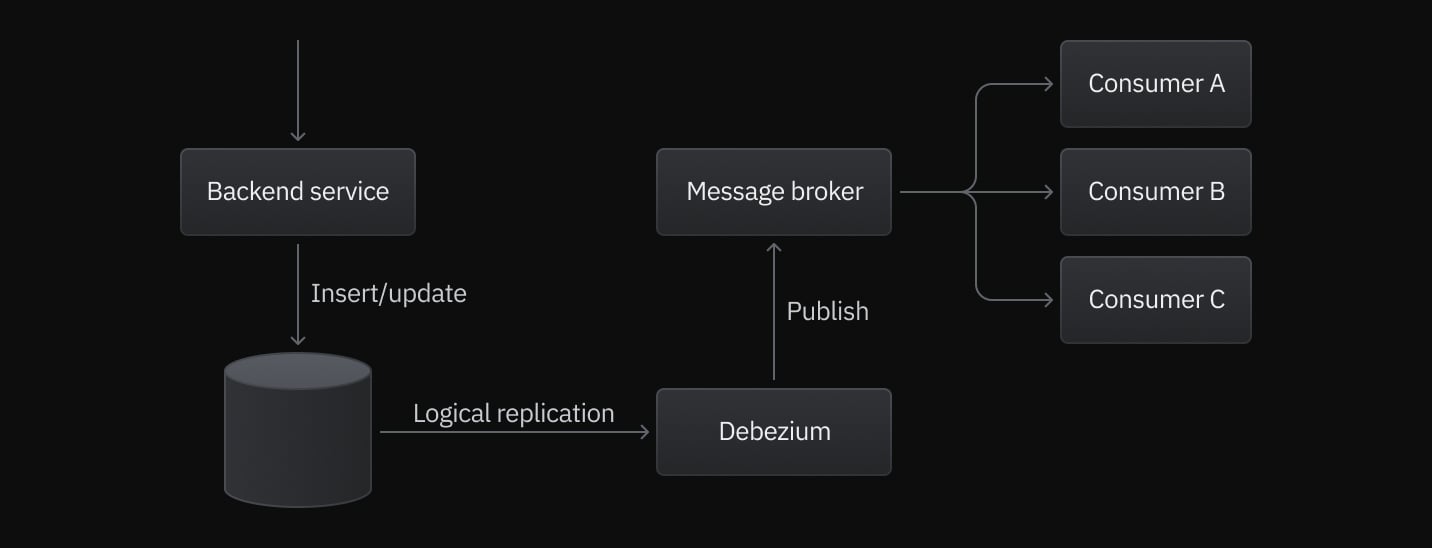
Debezium tracks its progress through the WAL by storing its current WAL offset. This means you can safely restart Debezium, and it will resume streaming change events from where it last left off. If the downstream message broker is unavailable, Debezium will retry sending messages until the broker returns online.
Get Started with Neon and Logical Replication
To start using Debezium with Neon’s serverless Postgres, sign up for Neon and create a project.
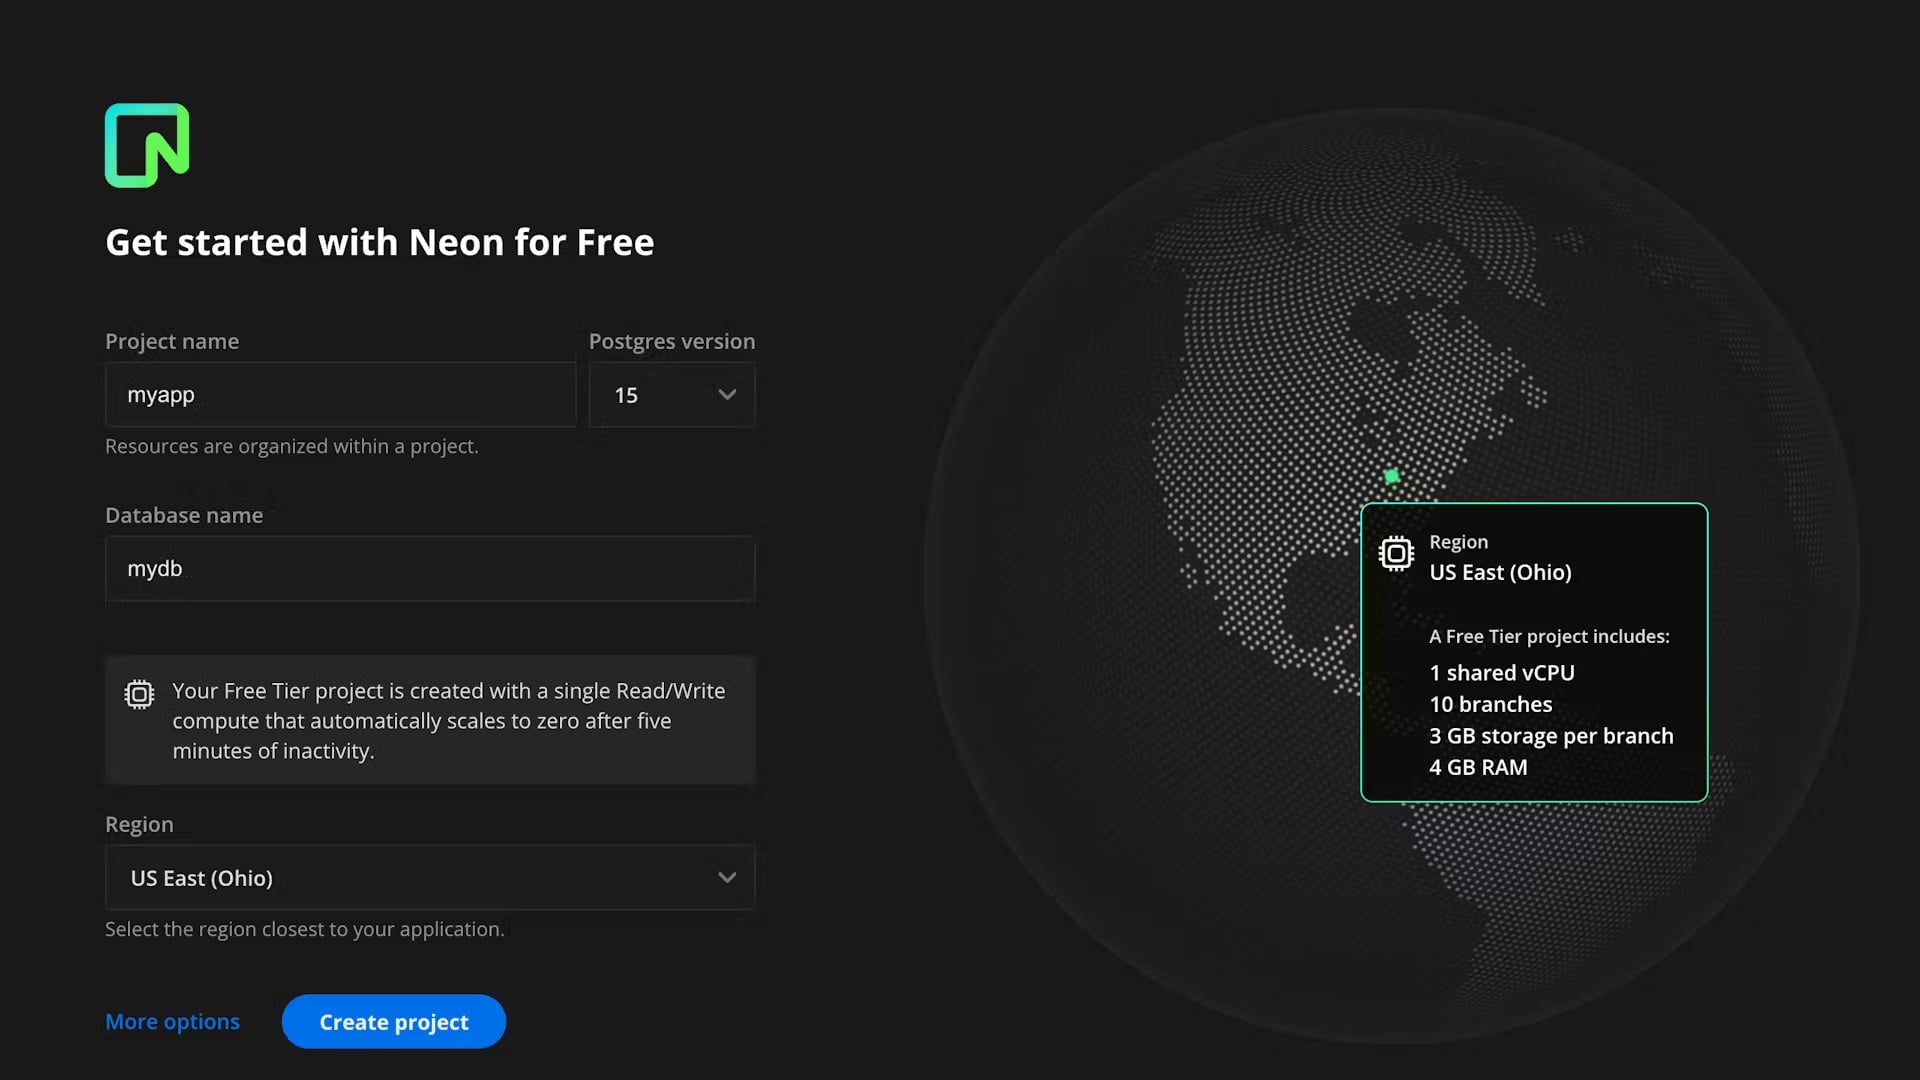
Once you have a project, enable logical replication:
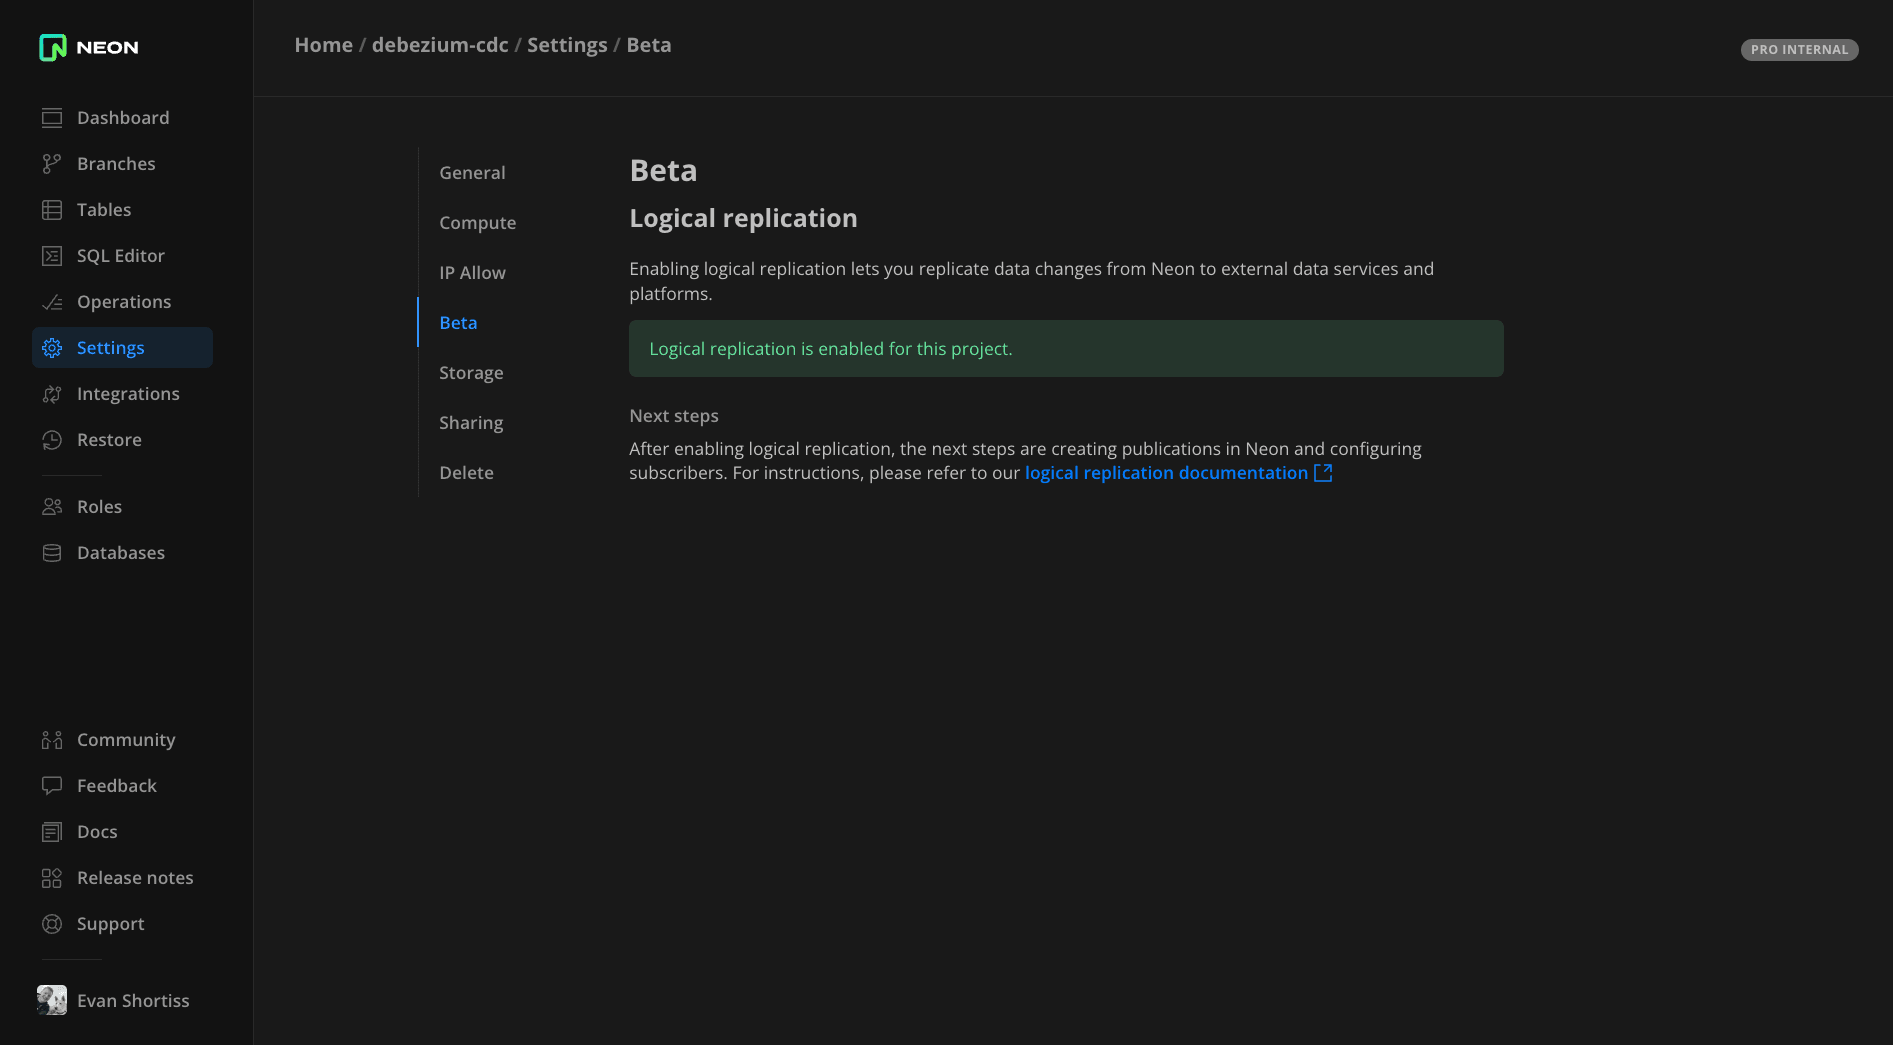
- Select your project in the Neon console.
- On the Neon Dashboard, navigate to Settings > Beta.
- Click the Enable button.
- Confirm that you understand the changes and click Enable again.
That’s it! A message will appear stating that logical replication is enabled for your project.
Before moving to the next section, create a table and add some data using the SQL Editor in the Neon console by running the following SQL statements:
CREATE TABLE playing_with_neon(id SERIAL PRIMARY KEY, name TEXT NOT NULL, value REAL);

INSERT INTO playing_with_neon (name, value)
VALUES
  ('Mario', random()),
  ('Peach', random()),
  ('Bowser', random()),
  ('Luigi', random()),
  ('Yoshi', random());
Configure Postgres as a Debezium Data Source
To begin, create a workspace folder in your development environment, and within it, create another folder to store your Debezium configuration.
mkdir -p debezium-neon-redis/debezium
cd debezium-neon-redis
Debezium uses a properties file to store the necessary configuration. Create a file named application.properties inside the debezium/ folder, and add the following configuration to define Postgres as a data source:
# PostgreSQL source connector properties
debezium.source.database.hostname=${PGHOST}
debezium.source.database.port=${PGPORT:5432}
debezium.source.database.user=${PGUSER}
debezium.source.database.password=${PGPASSWORD}
debezium.source.database.dbname=${PGDATABASE}
debezium.source.database.server.name=tutorial
debezium.source.snapshot.mode=initial
debezium.source.plugin.name=pgoutput
debezium.source.connector.class=io.debezium.connector.postgresql.PostgresConnector
debezium.source.schema.whitelist=public
table.include.list=playing_with_neon
This configuration instructs Debezium to:
- Connect to Postgres using the connection details defined in the
PGenvironment variables. - Accept payloads in
pgoutputformat. Neon also supports wal2json. - Subscribe to changes in the
playing_with_neontable. - Perform a table snapshot to inform downstream consumers of the initial state. This is useful if you’re adding Debezium to an existing application that has tables that already contain data and you’d like to process the existing rows and not just new rows.
Next, add the following lines to the application.properties. Comments are provided to explain what these configuration properties do:
# Enable human readable logs
quarkus.log.console.json=${JSON_FMT_LOG:false}

# Exclude the DB schema from event payloads to keep them lean
debezium.format.schemas.enable=false

# Keep track of the WAL offsets to safely resume on restarts
debezium.source.offset.storage.file.filename=data/offsets.dat
debezium.source.offset.flush.interval.ms=0
Nice work! You’ve enabled logical replication for a Neon serverless Postgres database and created a Debezium Server configuration to use it as a data source.
Configure Upstash Redis as a Debezium Data Sink
When Debezium captures database changes, it needs to stream them to a destination known as a “sink”. You’ll be using a Redis instance provided by Upstash as a sink; however, Debezium supports various sinks, meaning you can stream data to your preferred messaging infrastructure.
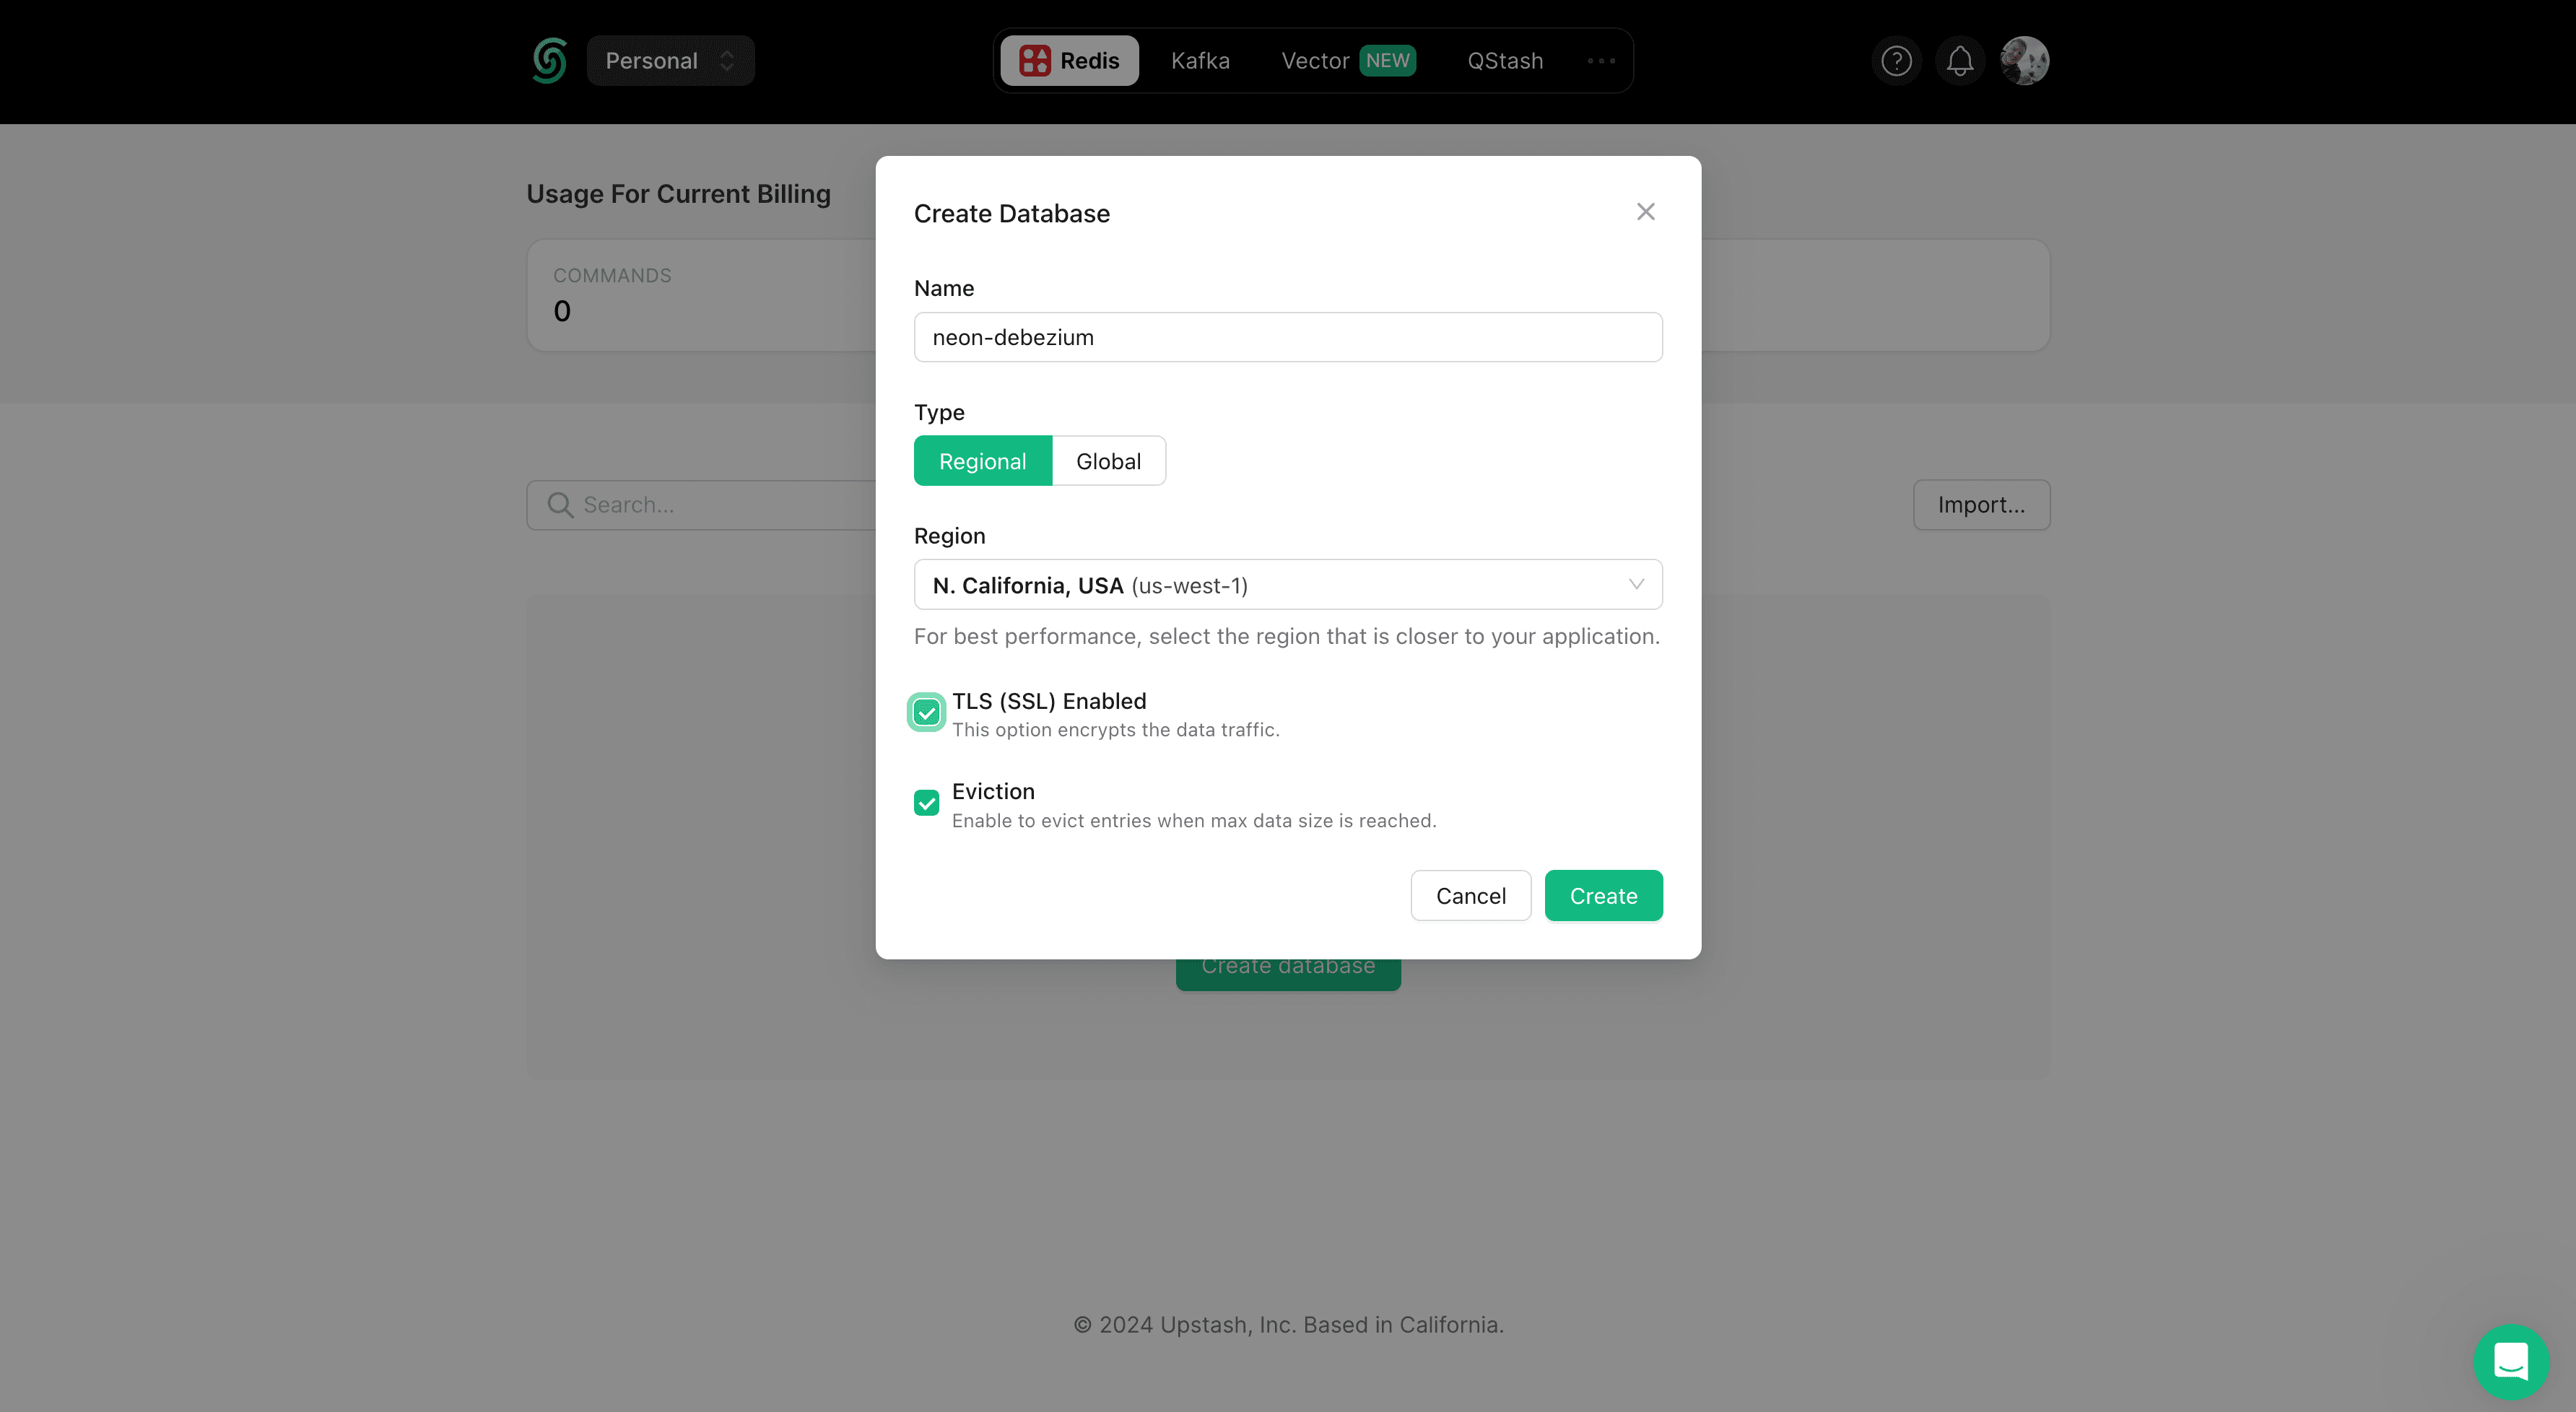
Provision a Redis instance by visiting console.upstash.com, choosing Redis, and clicking the Create Database button. Enter the following parameters when creating your Redis instance:
- Name:
neon-debezium - Type:
Regional - Region: Select the region closest to your Neon Postgres database.
- TLS (SSL) Enabled:
Yes - Eviction:
Yes
The form will resemble the following screenshot:
Add the following entries to the application.properties to define Redis as your data sink:
debezium.sink.type=redis
database.user=${REDIS_USER}
debezium.sink.redis.address=${REDIS_ADDRESS}
debezium.sink.redis.password=${REDIS_PASSWORD}
debezium.sink.redis.wait.retry.enabled=true
debezium.sink.redis.ssl.enabled=true
This configuration will send change events to a Redis stream data structure in your Upstash Redis instance. In typical Redis fashion, all data is stored under a key. The key name will be composed of the “debezium” prefix followed by the database schema and table name, resulting in debezium.public.playing_with_neon in this particular example.
Check the Redis documentation for a detailed description of all supported configuration properties for the Redis sink.
Start a Debezium Server Container
Your application.properties references environment variables. It’s time to create a .env file to store those variables to pass them into the Debezium Server container. You can also run Debezium on your host machine using Java and by downloading a Debezium Server distribution, but Docker and Podman allow you to test different versions quickly without affecting your host environment.
Visit the Dashboard for your project in the Neon Console, and select the Parameters only option in the Connection Details pane. Copy the values displayed and paste them into a .env file in the debezium-neon-redis folder you created earlier, removing the surrounding single quotes.
You’ll also need to define the Redis environment variables expected by the application.properties. These are displayed in your Redis instance’s Details section on the Upstash Console.
Your .env file should resemble the following example:
# file: .env

# Do not wrap the variable values in quotes. Docker doesn't like that...
PGHOST=ep-adj-noun-a1b2c3.us-west-2.aws.neon.tech
PGDATABASE=neondb
PGUSER=yourusername
PGPASSWORD=yourpassword

REDIS_ADDRESS=usw1-random-animal-12345.upstash.io:33324
REDIS_USER=default
REDIS_PASSWORD=upstashredispassword
Before continuing, confirm your folder structure matches this sample:
debezium-neon-redis
├── .env
├── debezium
│   └── application.properties
Now start a Debezium Server container using this command from within the debezium-neon-redis directory:
docker run --rm \
--name debezium-server \
--env-file .env \
-v $PWD/debezium:/debezium/conf \
debezium/server:2.5.1.Final
Debezium Server will start and print a series of logs. The logs include information about the initial snapshot being performed and should end with a line stating that Debezium is Searching for WAL resume position.
Viewing Changes in Redis and Consuming them with Node.js
Return to the Neon SQL Editor in your project and run the following INSERT statement:
INSERT INTO playing_with_neon (name, value) VALUES ('Yoshi', random());Debezium Sever should log a message resembling First LSN 'LSN{0/2159960}' received. This confirms that Debezium is successfully consuming the WAL!
To confirm data is being sent to Redis:
- Return to the console.upstash.com.
- Select your Redis instance.
- Navigate to the Data Browser tab.
- Set the filter to All Types or Stream, and search for
debezium*.
You should see a key named debezium.public.playing_with_neon. This stream contains the 5 initial rows you inserted in your database with matching timestamps. The new row you inserted a moment ago will also be there.
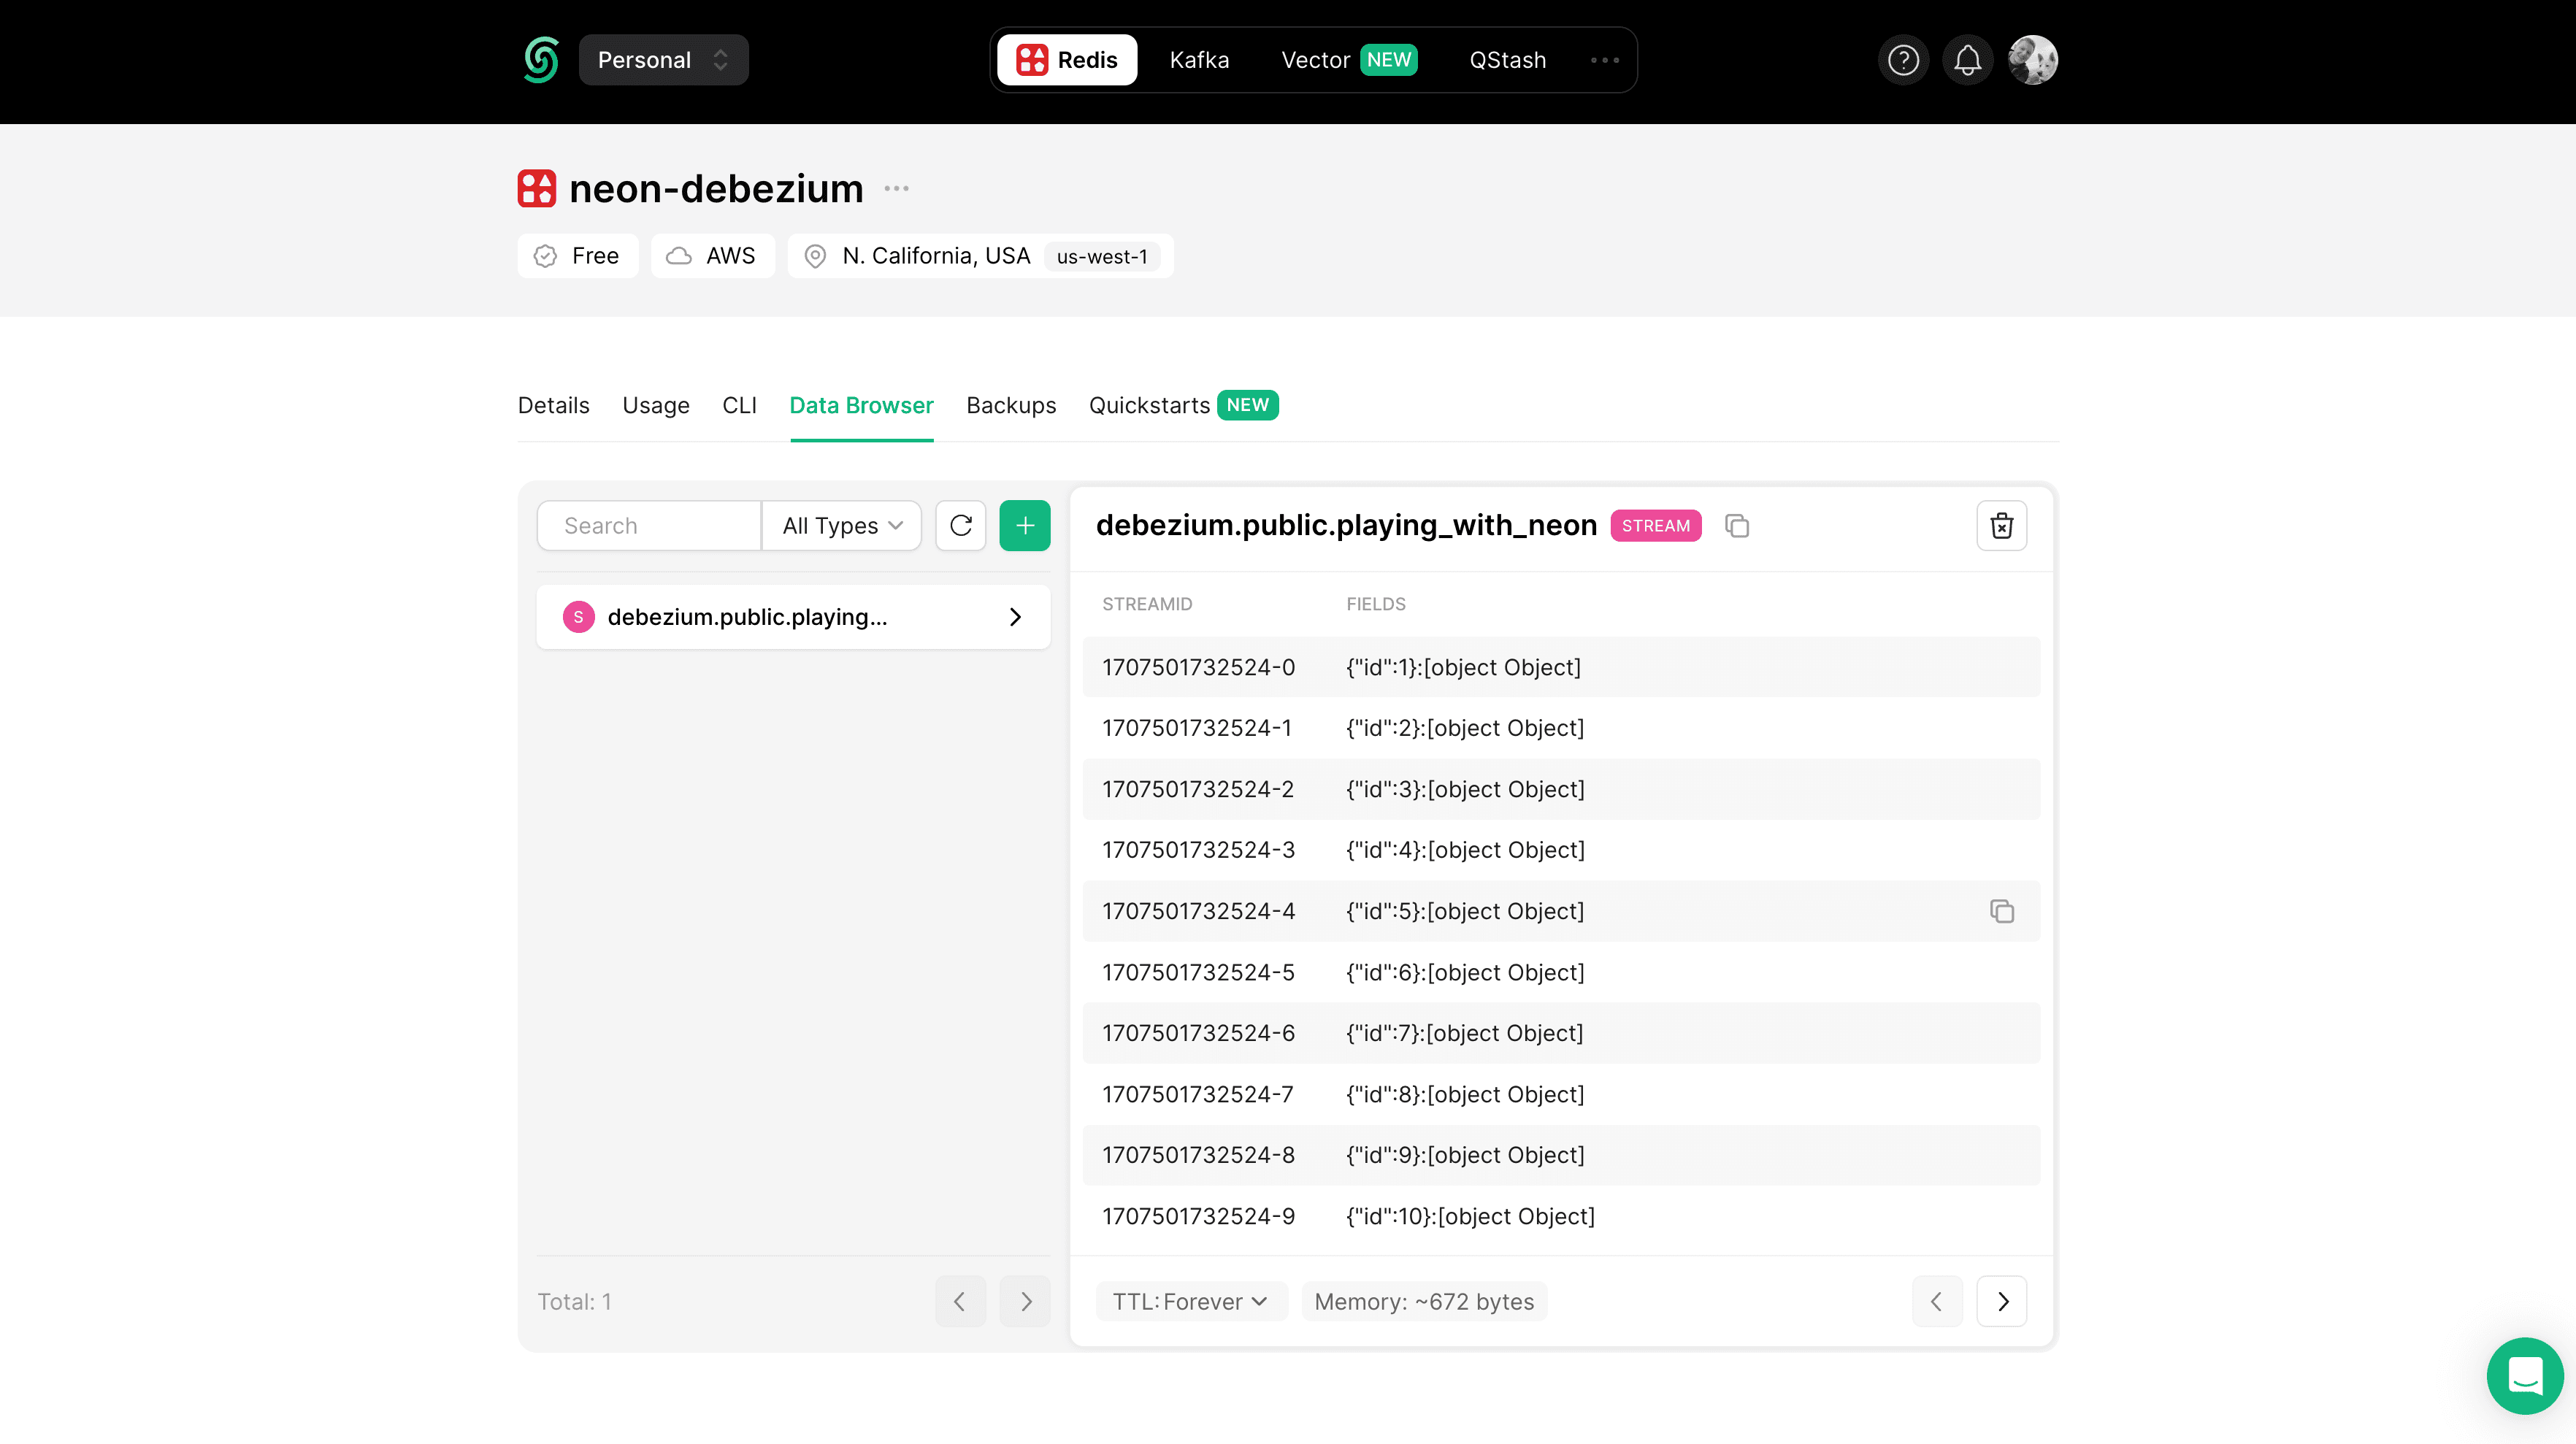
You can now use a Redis client and the XREADGROUP command to have consumer groups process messages in parallel as they arrive to the stream. Messages should be acknowledged using the XACK command, since this enables you to restart consumers and have them resume processing where they last left off.
A simple Node.js program to process messages as part of a consumer group would be similar to this, but with better error handling in a production codebase, of course. A complete example can be found in this repository on GitHub.
// file: stream-consumer.ts

import * as redis from 'redis'

const REDIS_STREAMS_KEY = 'debezium.public.playing_with_neon'
const REDIS_GROUP_ID = 'pwn-lr'

// Remember to change this value for each replica of this
// program that you're running. It must be stable value
// across restarts!
const REDIS_CONSUMER_ID = 'consumer-0'

async function main () {
  const client = redis.createClient({
    name: 'lr-demo-client',
    url: 'redis-stack:6379'
  })

  // The ID of '0' here makes sure the group consumes messages from
  // the beginning of the stream. Use '$' if you want to ignore old
  // messages that were created prior to the group's creation time
  await client.xGroupCreate(REDIS_STREAMS_KEY, REDIS_GROUP_ID, '0');

  readFromStream()

  async function readFromStream() {
    const res = await client.xReadGroup(
      REDIS_GROUP_ID, REDIS_CONSUMER_ID,
      { key: REDIS_STREAMS_KEY, id: '>' },
      { BLOCK: 0, COUNT: 10 }
    )

    if (res) {
      for (const { id, message } of res[0].messages) {
        // Add message processing logic here...

        // ...then ack the message!
        await client.xAck(REDIS_STREAMS_KEY, REDIS_GROUP_ID, id)
      }
    }

    // Immediately queue the next xReadGroup call
    setImmediate(readFromStream)
  }
}

main()
Conclusion
Neon’s support for Postres’ Logical Replication enables development teams to leverage Event-Driven Architectures to create robust, real-time applications with Postgres at the core. Change Data Capture platforms and technologies like Debezium provide low-code open-source solutions to reliably stream changes from Postgres to messaging systems such as Redis for further processing and analysis. If you’re looking for a Postgres database, sign up and try Neon for free. Join us in our Discord server to share your experiences, suggestions, and challenges.
